Rockwell adhesion tester
The Rockwell adhesion tester - Another simple method of determining the adhesion of a coating
Another method of adhesion testing, developed by the Union of German Engineers, (Verein Deutscher
Ingenieure, VDI) and also referred to as the Daimler-Benz test uses a standard
Rockwell hardness tester fitted with a Rockwell "C"-type diamond cone
indenter with an applied load of 150kg.

Rockwell adhesion tester
Rockwell adhesion test - Adhesion classified 1 to 6
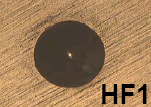
The result is obtained by using an optical microscope and classifying the adhesion as HF 1 to HF 6 according to the level of cracking or coating delamination around the indent. Only indents classified as HF 1 and HF 2 correspond to adequate adhesion. This method gives results rapidly with a minimum of effort. A typical indent after the adhesion test is shown below. The coating adhesion is classified as HF 1.

Rockwell indent - adhesion classified as HF 1
Rockwell adhesion test - Limitations
Unfortunately, this test does not purely assess the adhesion of the coating as the result is influenced by the substrate hardness and the coating thickness. Hence the minimum substrate hardness to give a reasonable result is 54 HRC and the maximum coating thickness is 5 microns.

|